# VerifyKit
VerifyKit is a service that offers alternative channels alongside SMS for phone number verification and it enables your users to log in or sign up to your apps quickly.
With the flexibility and reliability of VerifyKit, you can opt for WhatsApp, SMS OTP, Inbound SMS, Flash Call, and Outbound Call to verify your users’ phone numbers.
With more alternative methods available, your users will be able to choose the channel they want to use and complete the verification steps on the platform they prefer.
## WhatsApp OTP
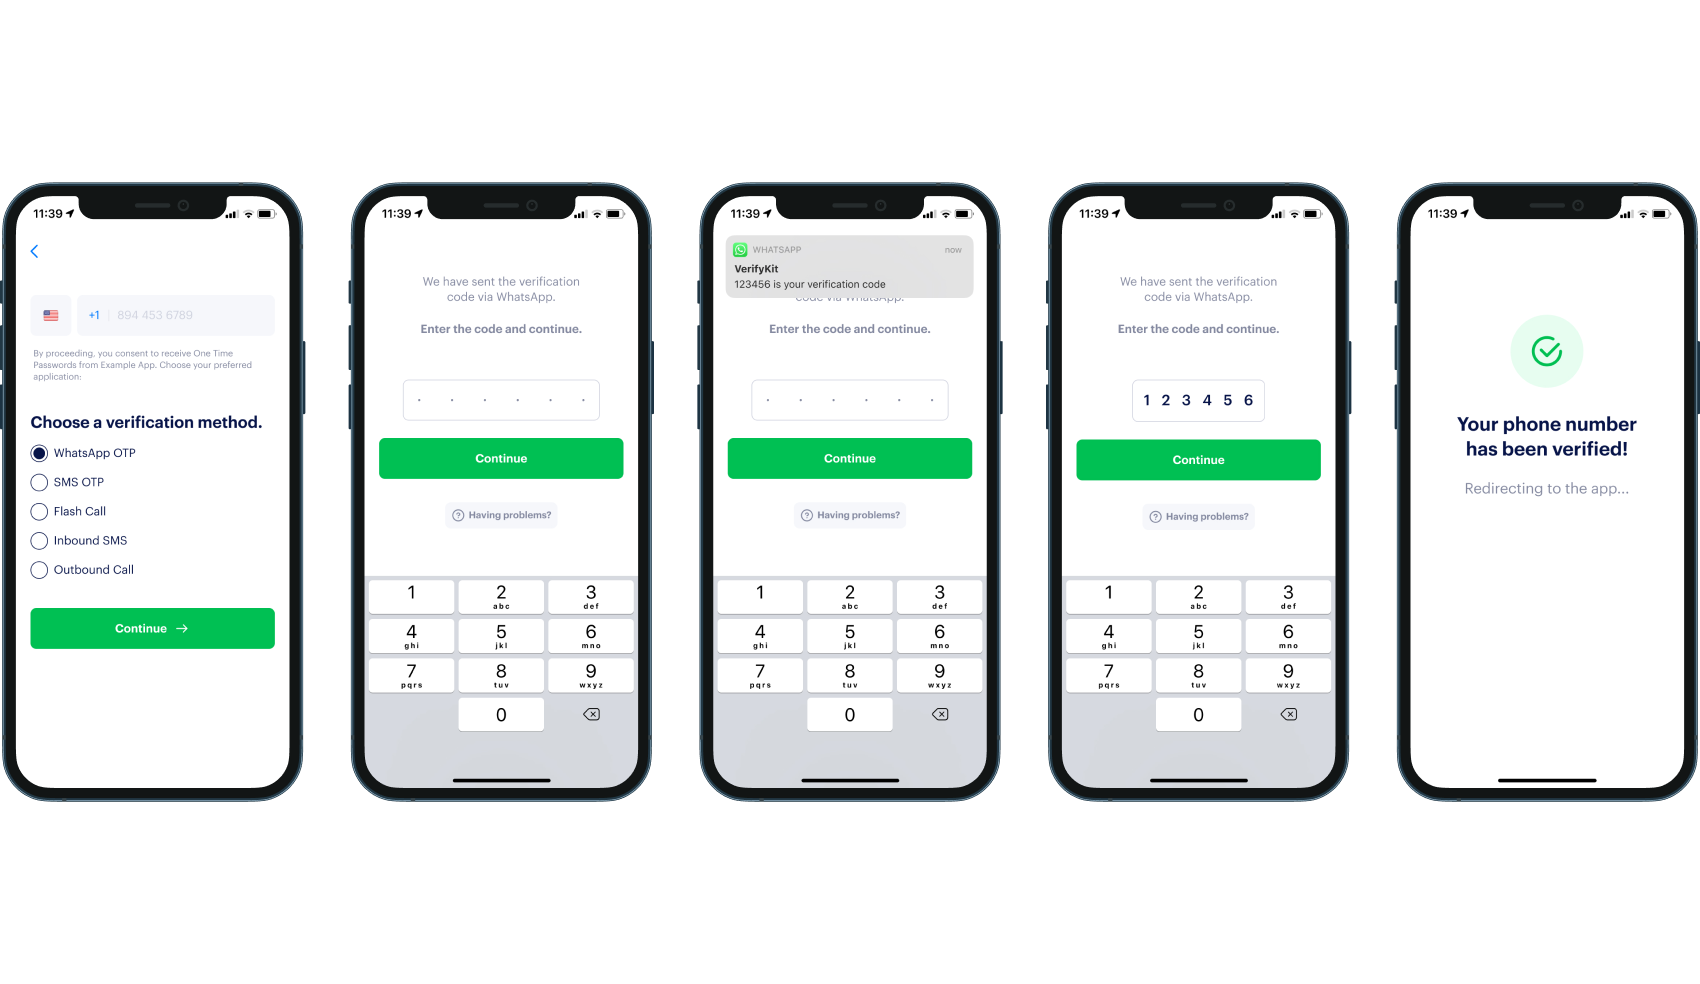
VerifyKit offers your business the capability to verify your users through WhatsApp, one of the most popular messaging apps in the world.
To use WhatsApp OTP, you need to have a verified WhatsApp Business account. If you do not have a WhatsApp Business account, you can contact us.
The WhatsApp OTP flow:
* The user selects WhatsApp OTP as the verification method.
* A code is sent to the user over WhatsApp from your WhatsApp Business Account.
* The user enters the code into the VerifyKit screen.
* Number verification is now complete.
To use WhatsApp OTP, you need to have a verified WhatsApp Business account. If you do not have a WhatsApp Business account, you can contact us.
## SMS OTP
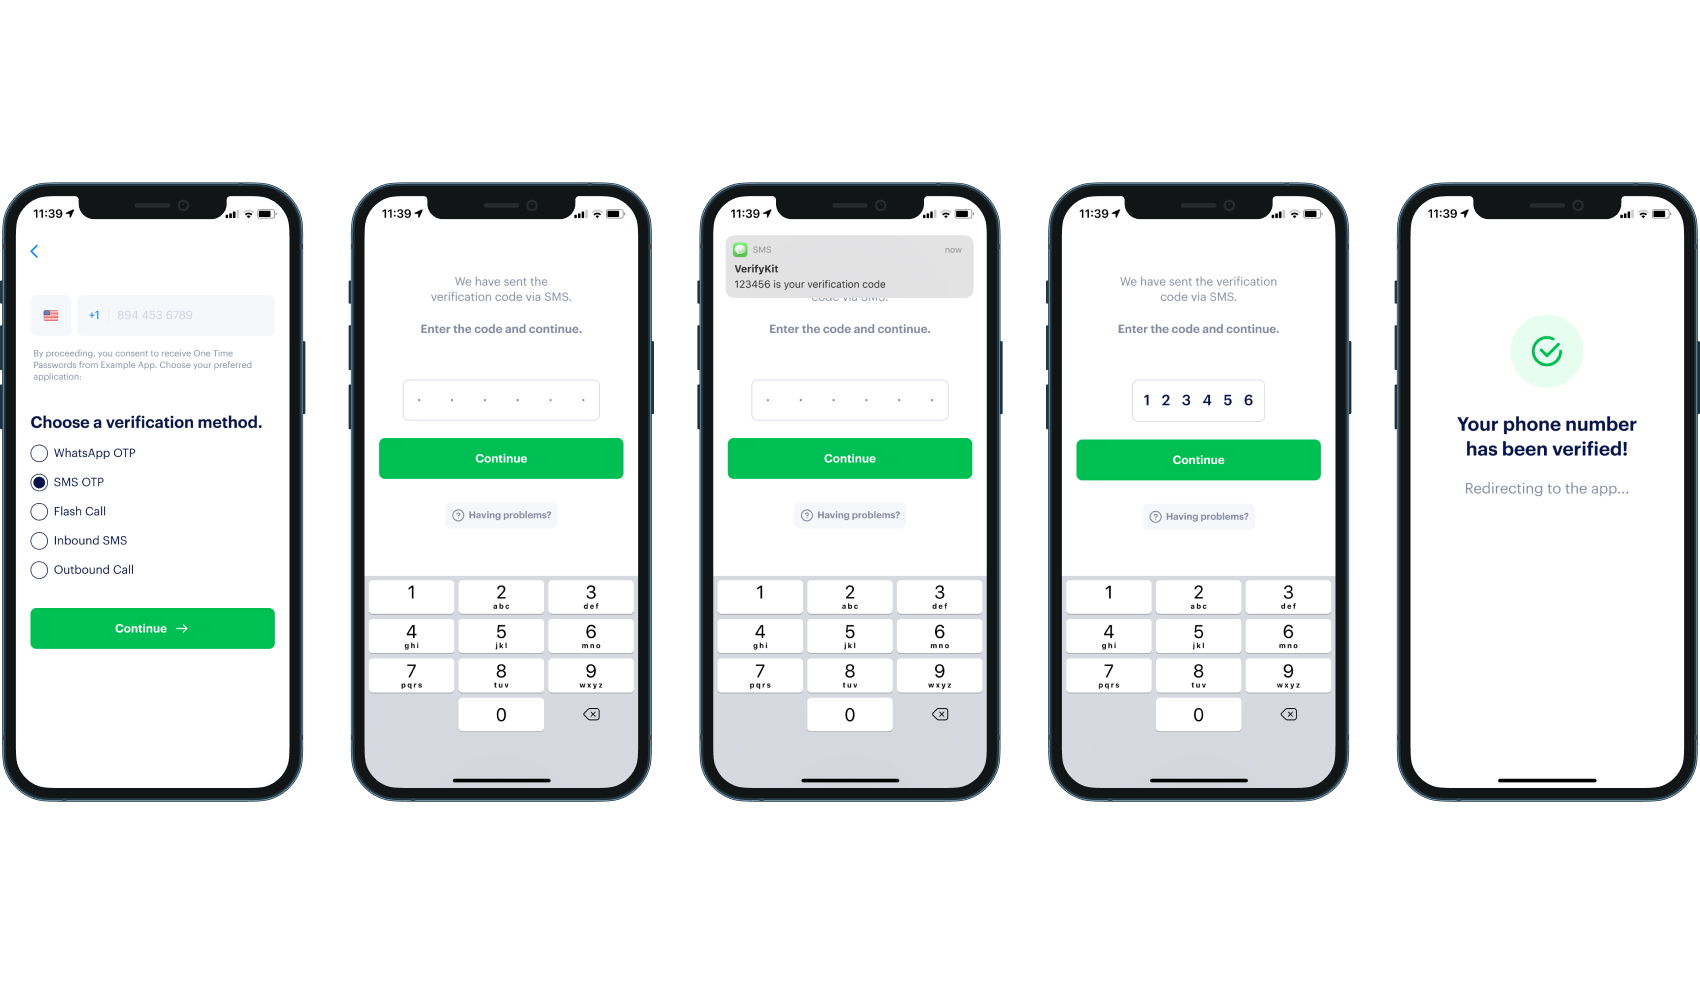
If your end-user prefers a particular method of SMS verification, VerifyKit lets you utilize it.
The SMS OTP flow:
* The user selects SMS OTP as the verification method.
* The user receives an SMS with a code.
* The user enters the code into the VerifyKit screen.
* Number verification is now complete.
## Inbound SMS
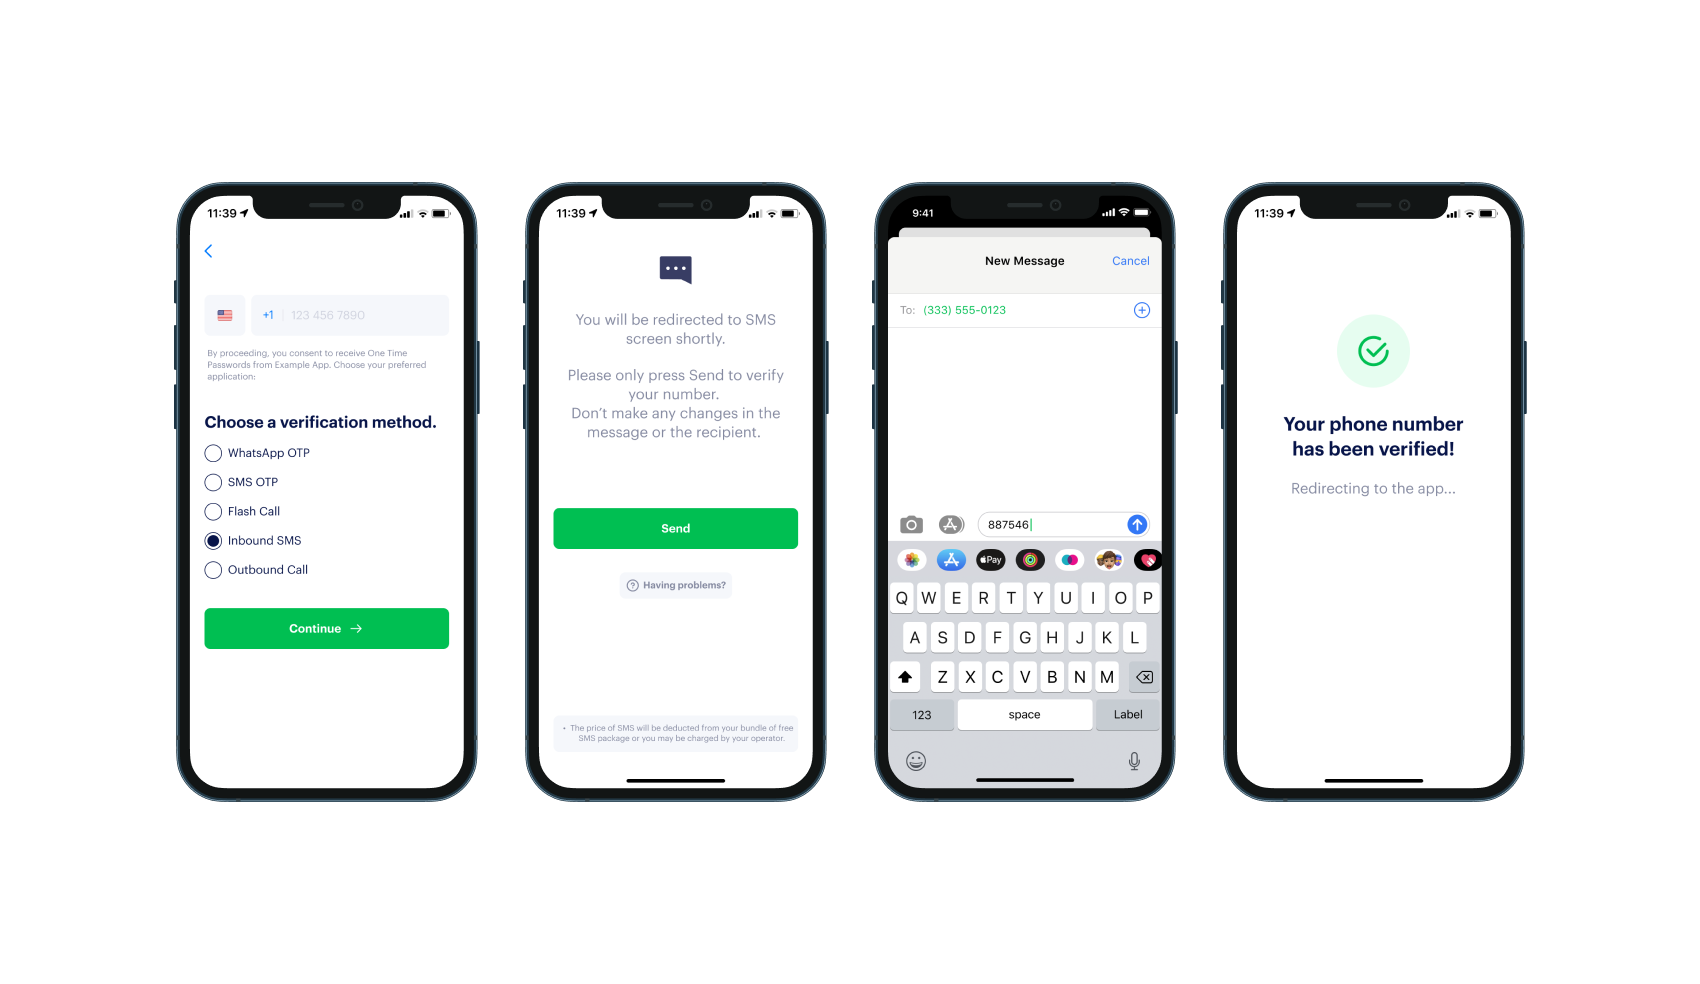
Verify your customers using the SMS messages they send to you with VerifyKit’s Inbound SMS method.
The Inbound SMS flow:
* The user selects Inbound OTP as the verification method.
* The user accesses the SMS screen by selecting the button on the screen.
* The user sends the code already on the SMS screen.
* Number verification is now complete.
## **FlashCall**
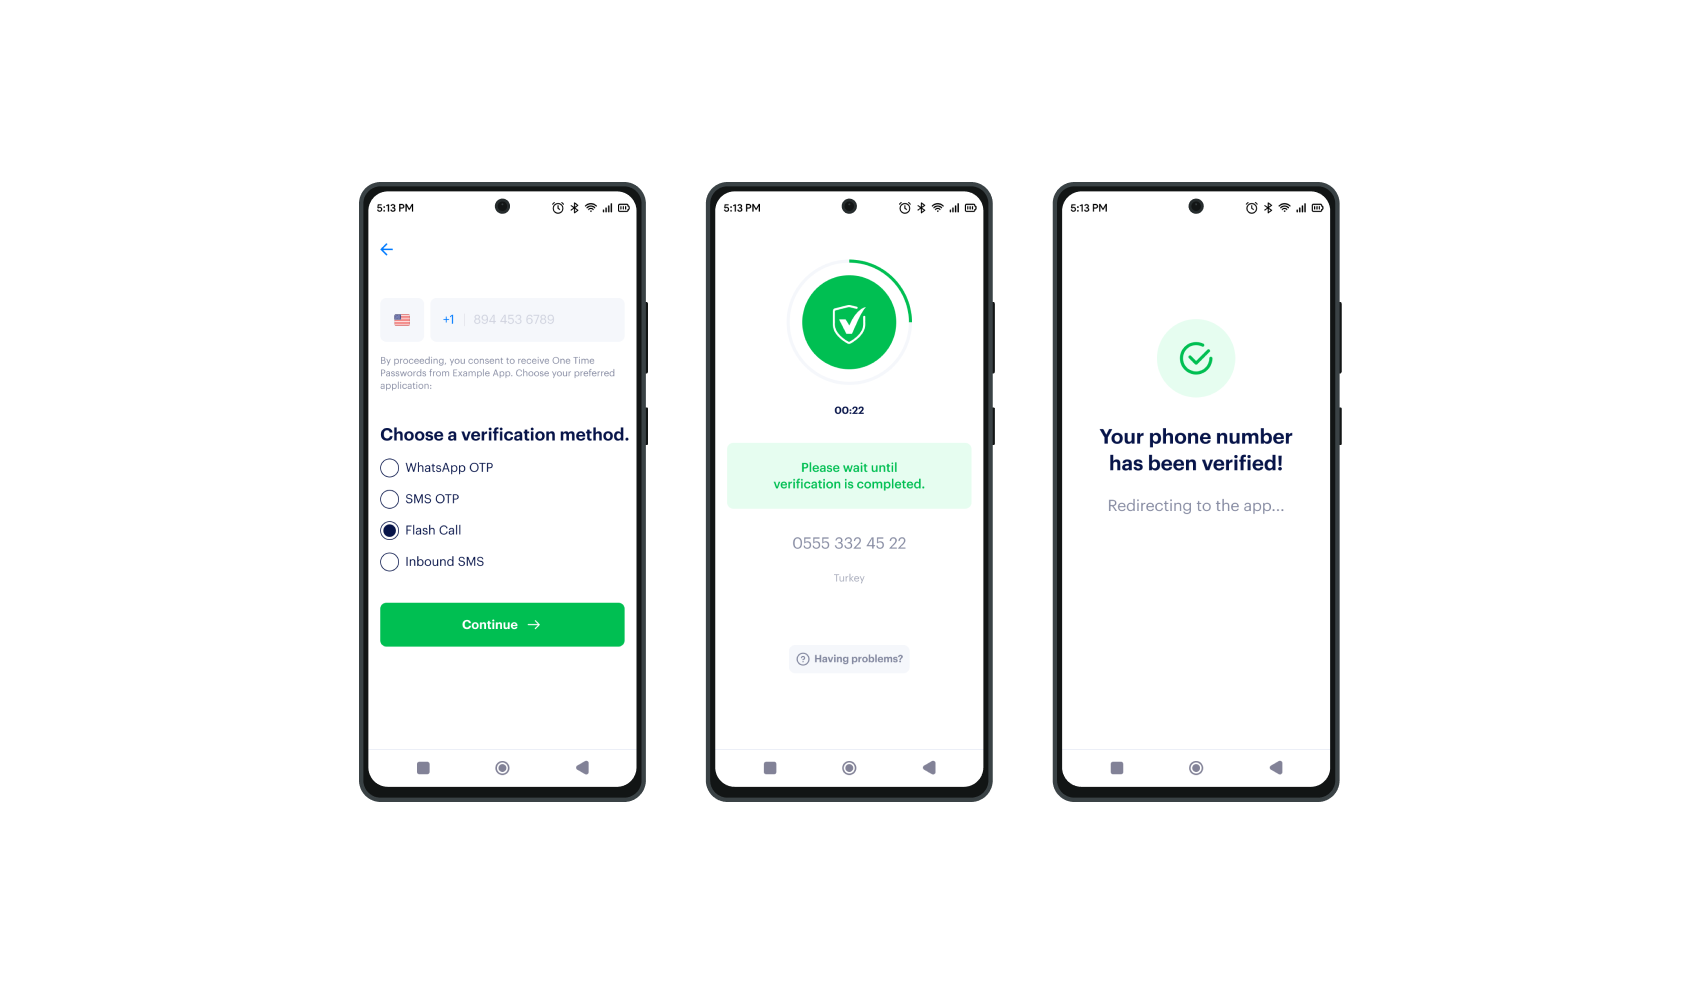
You can verify Android users in a matter of seconds by just making a phone call with FlashCall.
The FlashCall flow:
* The user selects FlashCall as the verification method.
* VerifyKit makes a call to the user.
* Phone number verification is complete once the call has ended.
## **Outbound Call**
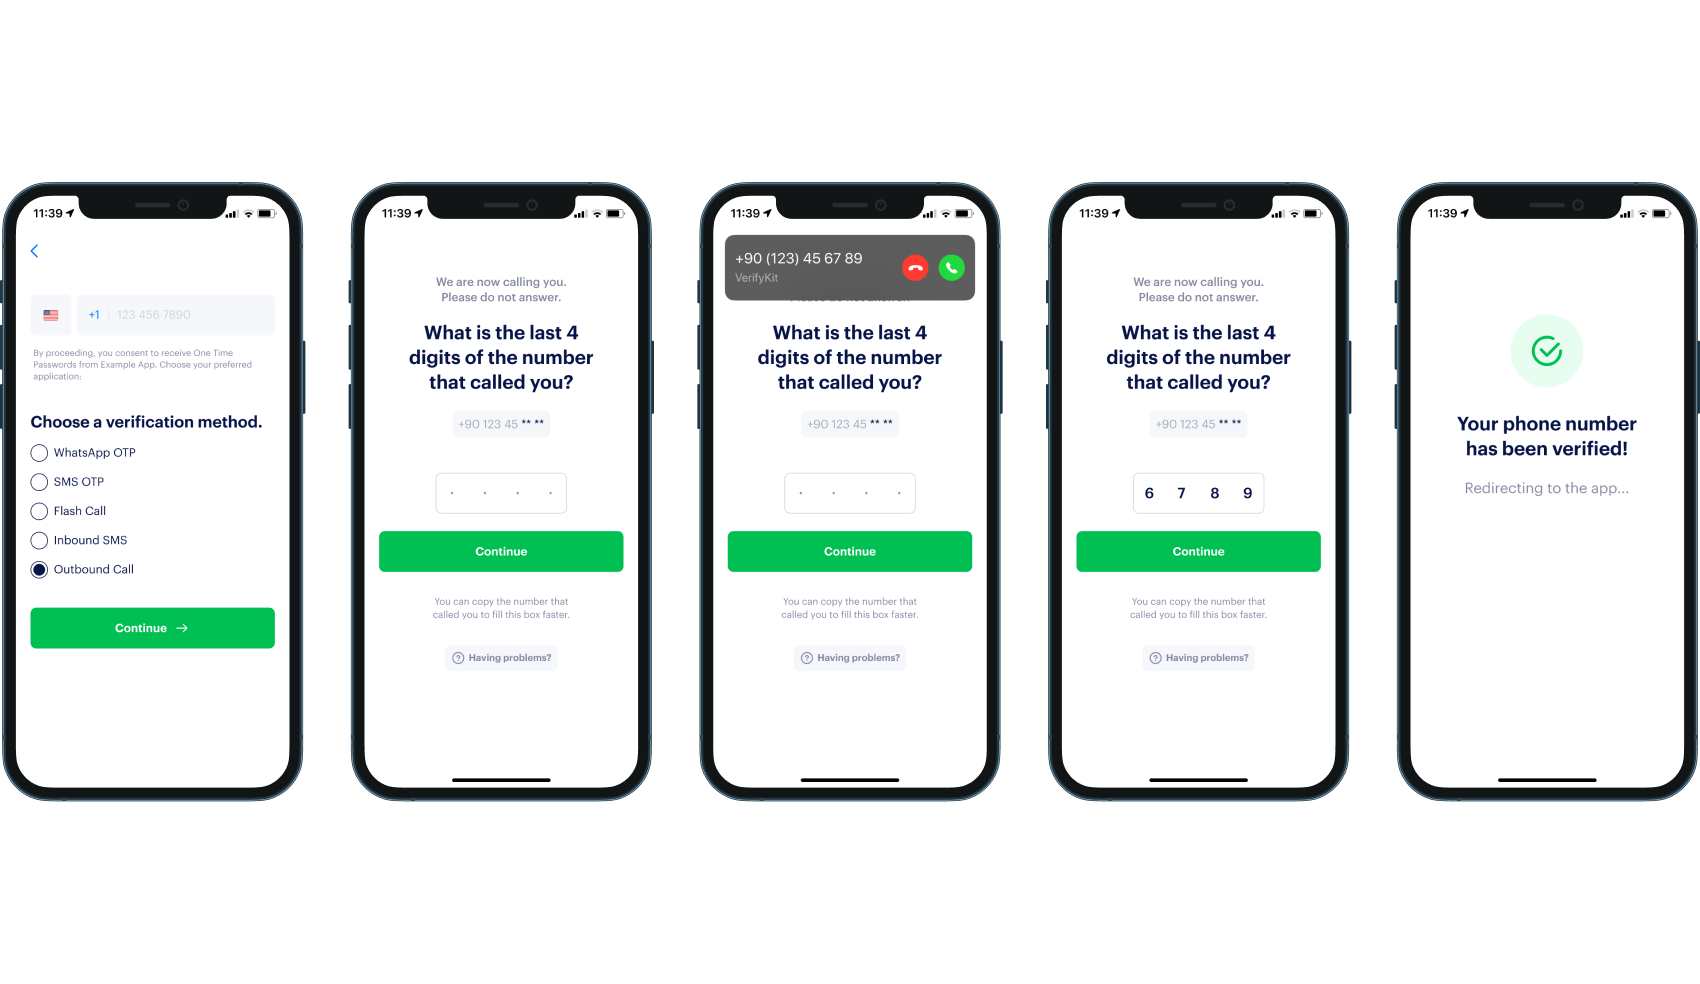
You can call both iOS and Android users to verify them with the Outbound Call verification method. The Outbound Call method is labeled "FlashCall" in the list of available methdods. The Outbound Call method is activated if the user is on iOS or Android and has not granted call permissions.
The Outbound Call flow:
* The user selects Outbound Call as the verification method.
* VerifyKit rings the user, leaving a missed call.
* The user enters a few digits from the missed call number, as instructed.
* Number verification is now complete.
## **Inbound Call**
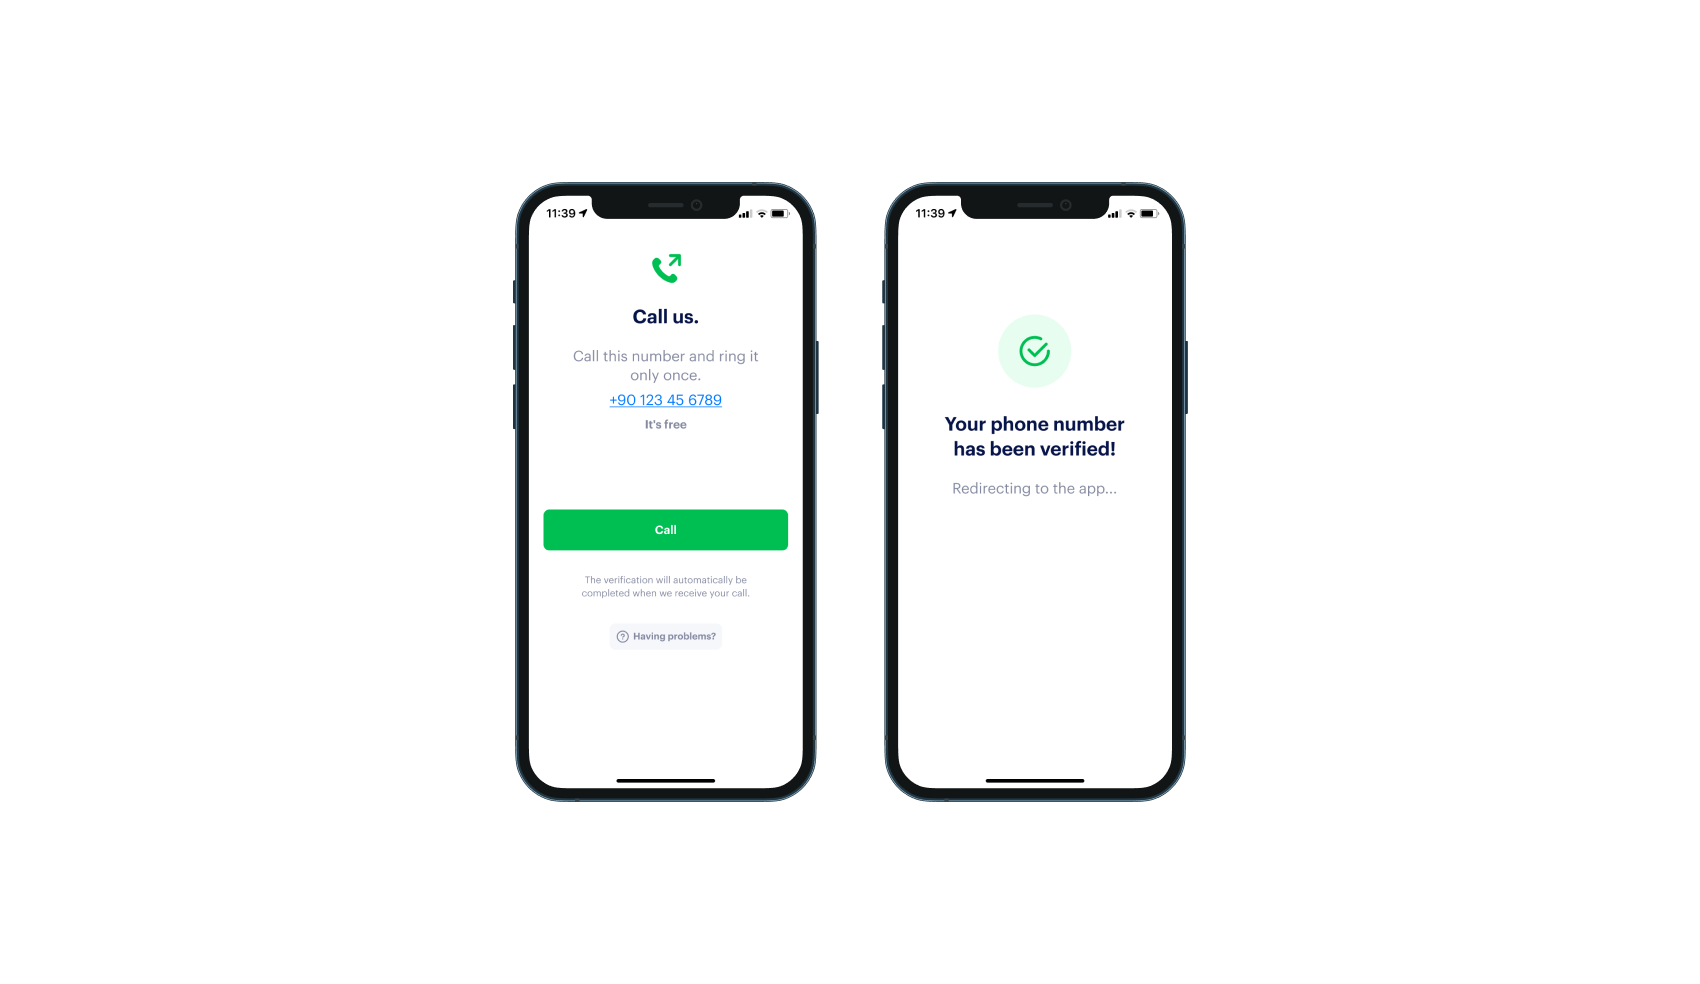
Your users will be able to complete the verification by calling VerifyKit using the Inbound Call verification method, which will be available soon.
{% content-ref url="/pages/cbMgYpmFmT8xlfVqKxzu" %}
[VerifyKit Account](/verifykit-account)
{% endcontent-ref %}
{% content-ref url="/pages/2EEZFobAMf8w56EJgfhf" %}
[VerifyKit Panel](/verifykit-panel)
{% endcontent-ref %}
{% content-ref url="/pages/8FHOfMekPBa7VCilrd62" %}
[Start to Verify](/start-to-verify)
{% endcontent-ref %}
## Integrate VerifyKit by using our SDKs
You can start integrating VerifyKit to your application easily with our SDKs. For detailed information on how to integrate VerifyKit, please browse our documentation.
### Supported Languages
You can integrate VerifyKit, using our SDKs, in given programming languages.
[PHP](https://github.com/verifykit/verifykit-sdk-php) [Node.js](https://github.com/verifykit/verifykit-sdk-nodejs) [Python](https://github.com/verifykit/verifykit-sdk-python)
# VerifyKit Account
You first need to create an account to start using VerifyKit. There are two ways of creating an account and neither requires any credit card details.
## Create an Account
### Creating an Account Using Google
You can easily create your VerifyKit account with the Sign in with Google option. When logging into your account, simply click the Log in with Google option to proceed.
You can also create a password for your VerifyKit account using panel. You can find more information on how to create a password for your VerifyKit account [here.](/verifykit-panel/account-management#set-a-password-with-google-log-in)
### Creating an Account Using E-Mail
You can create your VerifyKit Account using your personal information. Just create your account using your full name, company name, and e-mail address and set your password. If you choose to create an account using e-mail, we’ll kindly ask you to verify your e-mail address.
### Email Verification
After filling in the required fields to create an account, we’ll send a confirmation e-mail to the address you specified. Just click the confirmation button or follow the link in the e-mail to activate your account.
[Try Now](https://verifykit.com/register/?ref=doc_ca)
## VerifyKit Plans
When you use VerifyKit, you incur a fee for each verification. This charge varies according to the method used, the destination country, and the carriers. Please [click here](https://verifykit.com/pricing) for more information on pricing.
# FAQ
## What is VerifyKit?
VerifyKit is a purpose-built tool for web and mobile app developers to verify their users’ phone numbers. VerifyKit is a dependable and flexible solution that saves developers time and money by offering verification methods including WhatsApp OTP, Flashcall, Outbound Call, SMS OTP, and Inbound SMS while giving end-users the option to verify using their favorite way.
## Is VerifyKit available in my country?
Our global number verification services include WhatsApp OTP, SMS OTP, and outbound call verifications. Inbound SMS and Flashcall are only available in a few select countries as of now.
\*\* [Click here](https://verifykit.com/pricing) to view the countries where we offer SMS OTP, Inbound SMS, Flashcall, and Inbound Call verification services.
## What languages does VerifyKit support?
VerifyKit supports around 40 languages in verifications for mobile and web applications.
## Is VerifyKit a paid service?
VerifyKit charges a fee for each number verification performed via WhatsApp OTP, Flashcall, Outbound Call, SMS OTP, and Inbound SMS.
The rates for verification will vary depending on the method, country, and phone operators. Fees for verification can be found [here](https://verifykit.com/pricing).
You can begin using VerifyKit by depositing funds into your VerifyKit account.
## What verification methods are available?
VerifyKit supports WhatsApp OTP, Flashcall, Outbound Call, SMS OTP, and Inbound SMS verification methods.
## What are the verification costs?
VerifyKit charges a fee for each number verification performed via WhatsApp OTP, Flashcall, Outbound Call, SMS OTP, and Inbound SMS.
The rates for verification will vary depending on the method, country, and phone operators. Fees for verification can be found here.
Fees for services provided by VerifyKit are charged to your account balance with us.
## Which payment methods do you accept?
You can pay by credit card currently. We are working to include other alternative payment methods.
## Will my credit card be charged without notice?
VerifyKit makes no unauthorized charges to your credit card. You can deposit as much money as you want to your VerifyKit account. The system uses the money you have deposited in the form of account credits. When you use VerifyKit services, we will collect payments from your account balance when needed.
## How can I track my verification expenses?
Aside from the number of verifications, you can track your verification costs instantaneously on the dashboard display.
## Can I use VerifyKit only for mobile apps?
You can use VerifyKit for both mobile apps and web-based apps.
## Can I make changes to my verification channels at any time?
Sure. You can change the verification channels at any time by selecting the app that requires channel adjustment.
## Which account will my app users see during verification?
Your users will see a number belonging to VerifyKit in their verification process.
When users verify with WhatsApp OTP, they will see the VerifyKit account. Your users will see the VerifyKit account and sometimes a number belonging to VerifyKit dudring SMS OTP verifications. In verifications made with Flashcall, Outbound Call, and Inbound SMS, your users will see a VerifyKit number.
## How do I utilize the Inbound SMS method?
To get started with the Inbound SMS method, please contact .
## How do I utilize the Flashcall method?
To get started with the Flashcall method, please contact .
## How do I utilize the Outbound Call method?
To get started with the Outbound Call method, please contact .
## How does WhatsApp OTP verification work?
The user enters their phone number and chooses the WhatsApp OTP option from the VerifyKit screen. The user is then provided a 6-digit number over WhatsApp. By copying and pasting the code, the user navigates to the VerifyKit screen and completes the verification.
## How does SMS OTP verification work?
The user enters their phone number and chooses SMS OTP from the VerifyKit interface. VerifyKit then sends the user a 6-digit code. By copying and pasting the incoming code, the user navigates to the VerifyKit screen and completes the verification.
## How does Inbound SMS verification work?
The Messages app launches once the user enters their phone number and selects the SMS method from the VerifyKit screen. The user is presented with a code that needs to be sent to the VerifyKit account, and proceeds to input the code and completes the verification.
## How does Flashcall verification work?
Flashcall is only compatible with the Android OS. From the VerifyKit screen, the user enters the phone number and chooses the Flashcall method. VerfiyKit calls the user, and the verification is performed without the user taking any action.
## How does Outbound Call verification work?
From the VerifyKit screen, the user enters the phone number and chooses the Outbound Call method. The user receives a VerfiyKit call. The user completes the verification by entering all or part of the VerifyKit’s phone number on the VerifyKit screen.
## Why can't I see any other methods on the panel other than WhatsApp OTP and SMS OTP?
To use the Inbound SMS, Flashcall, and Inbound Call methods, please contact us at . These methods need to be manually enabled for your account. After that, you can start utilizing these methods for user verification.
## Can I authorize members of my team to use VerifyKit?
VerifyKit is a platform that allows multiple users to operate within one VerifyKit account. You can authorize as many people as necessary for adjustments and performance tracking after you connect your app on VerifyKit. You may modify these user authorizations at any time.
## I have created a VerifyKit account. I want to authorize my developer for app integration. Can I do this?
VerifyKit has been designed to grant financial authorization only to the account owner. Hence, only the account owner is authorized to connect an app. After you connect your app, you can give authorization to your developer for app integration.
## How often can I view the number of verifications performed with VerifyKit?
You can instantaneously track the number of verifications via the dashboard display and customize your reports according to categories such as operating system, app, verification channel and more.
# VerifyKit Panel
You can manage your apps using VerifyKit and have a detailed view into the verification processes right from the panel.
{% content-ref url="/pages/BeEFt10F41cskLByuhyl" %}
[Connect App](/verifykit-panel/connect-app)
{% endcontent-ref %}
{% content-ref url="/pages/0TqBWbPGcZyESdx5Vfz9" %}
[Account Management](/verifykit-panel/account-management)
{% endcontent-ref %}
{% content-ref url="/pages/cyIEgnshAetM3i3iErYA" %}
[Topping up the Account](/verifykit-panel/topping-up-the-account)
{% endcontent-ref %}
{% content-ref url="/pages/OpAqc79gYtcbEAPUFkf1" %}
[User Invite](/verifykit-panel/user-invite)
{% endcontent-ref %}
## What Information Is on the Dashboard?
After the VerifyKit integration into your app is complete and you start verifying phone numbers, you can view the number of successful verifications and the success rate for each verification method. You can filter your results by the app, operating system, country, and date.

# Connect App
You must first add your app from the panel to start using VerifyKit.
## How Do I Connect an App?
After logging into your account, select “My Apps” and then “Connect Your App”.

The app you connect can have iOS, Android, Web and REST platforms.
{% hint style="info" %}
You can update the name of your apps.
{% endhint %}
Choose which messaging platforms you want to include in your app. VerifyKit allows you to verify your users with WhatsApp, SMS OTP, Inbound SMS, Flash Call, and Outbound Call. You can select WhatsApp and SMS OTP methods from this screen. Please send an email to if you want to use the Outbound Call, Flash Call, or Inbound SMS methods. You can always change this setting in the future.
WhatsApp and SMS OTP verification methods are available on all platforms. Inbound SMS, Outbound Call, and FlashCall methods are currently only available in the iOS SDK and Android SDK. It will be available very soon in REST API and Web SDK.

## How Do I Set up My App?
VerifyKit works with iOS and Android operating systems and all web browsers.
Before setting up your app, you need to determine which platforms you will be using. Then you can set up your application on these platforms individually.
### iOS
If you’d like to use VerifyKit in your iOS app, select the “iOS” box in the “Add Platform” section.
Fill in the fields in the new window. You’ll need to enter a deep link to redirect your users to the relevant pages in your app, and type in the App Store Bundle ID.
Deep links are necessary for your users to return to the app after they complete the verification process. You can find more information on deep link integration [here.](/start-to-verify)
Enter your deep link and Bundle ID, then click Save. The page will refresh automatically and your Server Key, Client Key, and Client Secret will be displayed on the screen.
For more information on how to use the Server Key, the Client Key, and the Client Secret, click [here.](/start-to-verify)

#### Apple Review Mode
To activate Apple Review mode, choose the Review mode option, and save your settings. Upon saving your settings, you’ll be presented with the “Phone Number” and “One Time Password” parameters generated specifically for your app in the “Apple Review Mode” field.
When sending your app to Apple Store for review, be sure to include these parameters and specify that it’s possible to log into the app with them in the review note field.
You can also enable the Apple Review Mode even if your app’s SMS setting is off.
When this mode is enabled, the number and the password we’ll give you will be valid only for the version number you’ve entered.
Be sure to disable the Apple Review Mode feature after your application is approved by Apple.
We’ll send you a daily e-mail to remind you that you have apps in Apple review mode and you should turn this feature off.
### Android
If you’d like to use the VerifyKit verification solution in your Android app, select the “Android” box in the “Add Platform” section.
Fill in the fields in the new window. You’ll need to enter a deep link to redirect your users to the relevant pages in your app and type in the Package Name you got from Google Play Store.
Deep links are necessary for your users to return to the app after they complete the verification process. You can find more information on deep link integration [here.](/start-to-verify)
For more information on how to use the Server Key, the Client Key, and the Client Secret, click [here.](/start-to-verify)

### Web SDK
If you’d like to use the VerifyKit verification solution in your Web app, select the “Web” box in the “Add Platform” section.
Enter the full URL of your website in the “Trusted Domain” box.
WEB-SDK is a service that works within an iframe. For security purposes, you can only run VerifyKit on the sub-pages of the domain name that you’ve entered into the Trusted Domain field.
For more details on integration, click [here.](/start-to-verify)

### Rest API
The Rest API platform will automatically be defined for all your apps. You can also integrate VerifyKit using Rest API. For more details on how to integrate it into your app using the server-key parameter, click[ here.](/start-to-verify)

## Need to Know
### What Are Deep Links?
A deep link is required where the user sends a message to VerifyKit in WhatsApp verifications. Deep links allow users who complete the verification process with WhatsApp to return to your application. It’s crucial that your deep link settings are done properly in order to ensure a successful verification process.
### What Is a Server Key, a Client Key and a Client Secret?
Client key and Client Secret are parameters that you’ll need to use in order to integrate Android and iOS SDKs.
The Server Key parameter is used in all REST API requests that are sent to VerifyKit:
* When using iOS and Android SDKs, with the last request to complete the end-to-end verification process,
* With the first request when using Web-SDK,
* And with requests to other REST API endpoints
You’ll need to send this parameter to VerifyKit as a header parameter.
{% hint style="danger" %} **IMPORTANT**
The End-user should never have access to the Server Key parameter. Never hardcode this parameter into the codebase of you iOS and Android app and do not share it with anyone. If you lose this parameter, retrieve it from your app details page in the panel or contact us as soon as possible at
{% endhint %}
### What Do the Verification Screens Look Like?
Here is an example of the verification screen you'll see while using VerifyKit. Only the methods you’ve selected will be listed.

# User Invite
You can invite users and give them access to the apps in your VerifyKit account from the panel.
## How Do I Invite a User?
You can authorize a user to monitor or make changes to an app in your VerifyKit account by inviting them from the “User Management” page located in the Panel.
If you’ve never invited a user before:
* Navigate to the User Management page,
* Enter the e-mail address of the user you’d like to invite,
* Select which app the user is authorized for,
* From the list on the right, select which actions the user is authorized for,
* Click Save Changes to invite the user.
If you’re inviting a second user,
* Navigate to the User Management page,
* Click the “Invite New User” button on the top right,
* Enter the e-mail address of the user you’d like to invite,
* Select which app the user is authorized for,
* From the list on the right, select which actions the user is authorized for,
* Click the Save Changes button to invite the user.
An invitation e-mail will be sent to the invited user. When the user accepts the invitation, they’ll be able to manage the apps in your VerifyKit account.

## How Do I Revoke an Authorization From an Invited User?
You can delete a previously authorized user from the User Management page by clicking the icon located on the right of the individual users.
## **How Do I Manage User Permissions?**
You can manage user permissions on your VerifyKit account from the User Management page. First, click the Edit button next to the user. After you’ve edited the user’s permissions, save the changes. After this, the user will continue using their account with their new permissions.
## **What Do These Permissions Mean?**
Permissions in VerifyKit fall into two categories.
Account Permissions:
* View Dashboard: The user can see the verification statistics on the Dashboard.
* View Account Balance: The user can see the account balance.
* View Transactions: The user can see the payment flows in the account.
App Permissions:
* View Credentials: The user can see the credentials of an app to which they have access.
* Add Credentials: The user can add new credentials to the app to which they have access.
* Edit Application Settings: The user can make changes to the settings of the app to which they have access.
# Topping up the Account
VerifyKit is a prepaid system. You'll need to add funds to your account in order to verify your users.
## How Do I Add Funds to My Account?
After logging in to your VerifyKit account, click Top-up from the menu located in the upper right corner.

## How Do I Get a Receipt After Adding Funds?
We’ll issue a receipt for you using the information you’ve provided on the "Account Management" page. An e-mail containing the receipt will be delivered to you by our service provider.
{% content-ref url="/pages/0TqBWbPGcZyESdx5Vfz9" %}
[Account Management](/verifykit-panel/account-management)
{% endcontent-ref %}
## How Do I Know When My Balance Is Running Low?
When your VerifyKit account balance drops below $30, we’ll send you a notification e-mail to the address associated with your account.
# Account Management
To check your account details, click on your username on the right and select “Account Management” from the menu.
## Billing Information
We’ll issue an invoice for the payments you make to your VerifyKit account. We’ll need your billing information for this process.
## Changing Your Password
If you’d like to change your VerifyKit password, navigate to the Account Management page in the upper right corner of the panel. Then, find the Password tab and click Edit to change your password. After changing your password, be sure that you click Save Changes.
## Set a Password With Google Log-In
Even if you create your VerifyKit account using Google Login, you can set a password to your account. To do this, navigate to the Account Management page from the upper right corner of the panel, and select the Password tab. After setting your password, be sure that you click Save Changes. Once you set your new password, you can log in to the panel using the e-mail address associated with your account and your new password.
# Start to Verify
You can quickly complete your integration using VerifyKit's straightforward documentation.\
\
By integrating our iOS SDK, Android SDK, and Web SDKs, you can use VerifyKit interfaces, which provide a seamless user experience and are created in line with the latest design trends.
{% content-ref url="/pages/0I6LaVqoGGURf4nbZcrY" %}
[iOS SDK](/start-to-verify/ios-sdk)
{% endcontent-ref %}
{% content-ref url="/pages/cSzxSTcDnjg0RtDgJHqW" %}
[Android SDK](/start-to-verify/android-sdk)
{% endcontent-ref %}
{% content-ref url="/pages/mZpTTnG2kPHxqWi94xmm" %}
[Web SDK](/start-to-verify/web-sdk)
{% endcontent-ref %}
Using the Rest API, you can incorporate VerifyKit into your own design. That means you can still stay true to your design language while using VerifyKit for user verification.
{% content-ref url="/pages/c9Wmlli4Vca8FMSv6OoZ" %}
[Rest API](/start-to-verify/rest-api)
{% endcontent-ref %}
# iOS SDK
## How It Works?
1. Register your app at [https://verifykit.com](https://verifykit.com/) and get your client keys and server key.
2. Add VerifyKit SDK to your app
3. Configure and start VerifyKit SDK
4. When verification is complete, send **sessionId** which VeriyfKit SDK gives you to your backend service.
5. At your server side, get user's phone number from VerifyKit service with **serverKey** and **sessionId**. You can check [Rest Api Docs.](https://app.gitbook.com/o/-MNYXEHRQyQE-fDwM2pr/s/MSJXU5NMdqE206LMn3AL/~/changes/dzIMOEIPZqCe1xjSsjYj/start-to-verify/rest-api)
{% hint style="danger" %}
## **IMPORTANT NOTE**
**ServerKey** is used for getting info from VerifyKit service.
Please keep **ServerKey** safe. Do not include it in your client's code base.
{% endhint %}
## VerifyKit Flow
## Installation
### Requirements
* Xcode 11.0+
* iOS 10.3+
### CocoaPods
You can install framework via [CocoaPods](https://cocoapods.org/pods/VerifyKit).
{% code title="CLI" %}
```
pod 'VerifyKit'
```
{% endcode %}
### Configure Info.plist
To successfully use the framework, you need to add `VerifyKitKey` and `VerifyKitSecret` to your plist file. This step is mandatory.
To open a third party messaging app from your application, you need to add their url schemes to `LSApplicationQueriesSchemes` key in your plist file. After iOS14, to open Associated Domain URLS in a device which uses a different default browser then Safari, you also need to add `https` as url scheme.
Open your Info.plist as source code and insert the following XML snippet into the body of your file just before the final `dict` element.
{% code title="XML" %}
```xml
VerifyKitKey{your-verifykit-key}VerifyKitSecret{your-verifykit-secret-key}LSApplicationQueriesSchemeswhatsapptelegramviberhttps
```
{% endcode %}
### Deep Link
After a successful validation with a third party messaging app, the user needs to return to main app. If your application has an Associated Domain, we can add a deeplink to our message for easy and quick redirect.
If you support Associated Domains, please fill out **Deeplink** field at VerifyKit portal with your domain.
If you don't support Associated Domains, you can enter a custom link with your application's url scheme to **Deeplink** field, like *yourapp\://welcome*. However, some messaging apps doesn't recognize url schemes as clickable links, so quick redirect may not work in this scenario.
## Usage and Configuration
You can get the result via `VerifyKitDelegate` protocol.
VerifyKit only dismisses `viewControllerForLogin()` automatically when `didSuccess` delegate is called.
To give user a chance to try other validation methods or to start again, `viewControllerForLogin()` doesn't get dismissed on `didFail`. If you want to dismiss it on some specific error type, you can do that manually.
{% code title="Swift" %}
```swift
import VerifyKit
let kit = VerifyKit()
let viewController = kit.viewControllerForLogin()
self.present(viewController, animated: true, completion: nil)
viewController.kitDelegate = self
extension ViewController: VerifyKitDelegate {
func didSuccess(with sessionCode: String) {
print("VerifyKitDelegate didSuccess with sessionCode:(sessionCode)")
}
func didFail(with error: VerifyKitError) {
print("VerifyKitDelegate didFail with error:(error)")
}
}
// configuration
let options = VerifyKitOptions(logActive: true)
let kit = VerifyKit(options: options)
```
{% endcode %}
### Objective-C
{% code title="Objective-C" %}
```objectivec
#import "ViewController.h"
@interface ViewController ()
@end
@implementation ViewController
- (void)viewDidLoad {
[super viewDidLoad];
// Do any additional setup after loading the view.
VerifyKitOptions *options = [[VerifyKitOptions alloc] initWithEnvironment: VerifyKitEnvironmentDebug logActive: YES deviceID: nil];
VerifyKitInstance *kit = [[VerifyKitInstance alloc] init];
UIViewController *controller = [kit viewControllerForLogin_objC];
[controller setKitObjCDelegate: self];
[self presentViewController:controller animated:YES completion:nil];
}
- (void)didFailWith:(VerifyKitNSError * _Nonnull)nsError {
NSLog(@"%@", nsError.localizedDescription);
}
- (void)didSuccessWith:(NSString * _Nonnull)sessionCode {
NSLog(@"%@", sessionCode);
}
@end// Some code
```
{% endcode %}
### Interrupted Session
There may be a case when user chooses a third party messaging app for validation, sends a message, but doesn't return to main app and kills it. In that case, that user is verified with VerifyKit but the main app doesn't know it yet.
To fix this, we have a method to check interrupted session status. Using this method is optional and up to you.
**VerifyKit will handle the interrupted verification even if you don't implement this method.**
{% code title="Swift" %}
```swift
VerifyKit.checkInterruptedSession { [weak self] sessionCode in
guard let sessionCode = sessionCode else {
// Start VerifyKit flow or do what your app needs
return
}
// You have an interrupted sessionCode from last time.
// Tell your API.
print("sessionCode (sessionCode)")
}
```
{% endcode %}
For Objective-C
{% code title="Objective-C" %}
```objectivec
[VerifyKitInstance checkInterruptedSessionWithCompletion:^(NSString * _Nullable sessionCode) {
if (sessionCode == nil) {
// Start VerifyKit flow or do what your app needs
} else {
// You have an interrupted sessionCode from last time.
// Tell your API.
NSLog(@"sessionCode %@", sessionCode);
}
}];
```
{% endcode %}
### VerifyKitOptions Struct
You can change the settings declared in `VerifyKitOptions` struct.
{% code title="Swift" %}
```swift
public struct VerifyKitOptions {
var environment: VerifyKitEnvironment = .debug // default
var logActive: Bool = true // default
var deviceID: String? // optional
var countryCode: String? // optional ("US")
var phoneCode: String? // optional ("1") or ("+1")
var phoneNumber: String? // optional ("1234567890")
}
public enum VerifyKitEnvironment {
/// Stage environment for debug
case debug
/// Production environment for distribution
case release
}
```
{% endcode %}
If the host application wants to let the user input their phone number and then pass it to the SDK, it can be done using the `countryCode`, `phoneCode` and `phoneNumber` parameters.
## Other Notes
Before your app release, please change the VerifyKitEnvironment to 'release' instead of 'debug'. This product includes software([CyrptoSwift](https://cocoapods.org/pods/CryptoSwift)) developed by [Marcin Krzyzanowski](http://krzyzanowskim.com/).
### Backend Integration
When the verification is complete, in order to get information of the verified user, you should integrate with VerifyKit Rest API. After receiving the sessionID variable from the Web SDK, you can fetch your client's data, such as phone numbers , from VerifyKit Rest API service.
This integration requires a **ServerKey** token that is unique to your application in VerifyKit and used as both an identifier and a security measure. For this reason, you have to use your **ServerKey** token in backend integration. You can not use **ServerKey** on your client-side.
For further info on how to integrate this part please click[ here.](/start-to-verify/rest-api#last-step-complete-validation)
{% hint style="info" %}
**Need some help?**
We all need a little help sometimes. If you have any question or request, feel free to [**create an issue**](https://github.com/verifykit/verifykit-sdk-ios/issues).
{% endhint %}
# Android SDK
## How It Works?
1. Register your app at and get your client keys and server key.
2. Add VerifyKit SDK to your app
3. Configure and start VerifyKit SDK
4. When verification is complete, send **sessionId** which VerifyKit SDK gives you to your backend service.
5. At your server side, get user's phone number from VerifyKit service with **serverKey** and **sessionId**. You can check [Rest Api Docs](https://app.gitbook.com/o/-MNYXEHRQyQE-fDwM2pr/s/MSJXU5NMdqE206LMn3AL/~/changes/dzIMOEIPZqCe1xjSsjYj/start-to-verify/rest-api).
{% hint style="danger" %}
## **IMPORTANT NOTE**
**ServerKey** is used for getting info from VerifyKit service.
Please keep **ServerKey** safe. Do not include it in your client's code base.
{% endhint %}
## VerifyKit Flow
## Installation
### Requirements
Minimum SDK Version is api 16
{% code title="Java" %}
```java
// Add it to your app build.gradle at the end of repositories:
implementation 'org.bitbucket.verifykit:verifykit-android:0.11.1'
//Add it to your root build.gradle at the end of repositories:
allprojects {
repositories {
...
maven { url 'https://jitpack.io' }
}
}
```
{% endcode %}
## Usage
In your Application file you should initialize VerifyKit. **VerifyKit.init()** method needs VerifyKitOptions object.
#### Usage
{% code title="Application.kt" %}
```
val theme = VerifyKitTheme(
backgroundColor = Color.WHITE
)
VerifyKit.init(
this,
VerifyKitOptions(
isLogEnabled = true,
verifyKitTheme = theme
)
)
```
{% endcode %}
You can call VerifyKit.startVerification(this) method from your Activity or Fragment then get the result via VerifyCompleteListener interface from your Activity or Fragment.
#### VerifyCompleteListener
{% code title="Kotlin" %}
```kotlin
VerifyKit.startVerification(this, object : VerifyCompleteListener {
override fun onSuccess(sessionId: String) {
// TODO operate SUCCESS process
}
override fun onFail(error: VerifyKitError) {
// TODO operate FAIL process
}
})
```
{% endcode %}
**Optional:** You can pass user phone number to VerifyKit with `startVerification` method. In this way VerifyKit doesn’t ask phone number to user
{% code title="Kotlin" %}
```kotlin
VerifyKit.startVerification(
activity = this,
countryPhoneCode = "+90",
phoneNumber = "5555555555",
mCompleteListener = object : VerifyCompleteListener {
override fun onSuccess(sessionId: String) {
// TODO operate SUCCESS process
}
override fun onFail(error: VerifyKitError) {
// TODO operate FAIL process
}
})
```
{% endcode %}
#### VerifyKit.checkInterruptedSession
There may be a case when user chooses a third party messaging app for validation, sends a message, but doesn't return to main app and kills it. In that case, that user is verified with VerifyKit but the main app doesn't know it yet.
To fix this, we have a method to check interrupted session status.
{% code title="Application.kt" %}
```kotlin
VerifyKit.checkInterruptedSession(object : VerifyCompleteListener {
override fun onSuccess(sessionId: String) {
// sessionId
}
override fun onFail(error: VerifyKitError) {
// error
}
})
```
{% endcode %}
### AndroidManifest
Open the /app/manifest/AndroidManifest.xml file.
Add the following meta-data elements, an activity for VerifyKit and intent filter for App Link inside your application element:
```
```
An Android App Link is a deep link based on your website URL that has been verified to belong to your website. So clicking one of these immediately opens your app if it's installed—the disambiguation dialog does not appear. Though the user may later change their preference for handling these links. For verifying your App Link see [document](https://developer.android.com/training/app-links/verify-site-associations).
### ProGuard
`-keep class com.verifykit.sdk.core** { *; }`
### Backend Integration
When the verification is complete, in order to get information of the verified user, you should integrate with VerifyKit Rest API. After receiving the sessionID variable from the Web SDK, you can fetch your client's data, such as phone numbers , from VerifyKit Rest API service.
This integration requires a **ServerKey** token that is unique to your application in VerifyKit and used as both an identifier and a security measure. For this reason, you have to use your **ServerKey** token in backend integration. You can not use **ServerKey** on your client-side.
For further info on how to integrate this part please click [here.](/start-to-verify/rest-api#last-step-complete-validation)
{% hint style="info" %}
**Need some help?**
We all need a little help sometimes. If you have any question or request, feel free to [**create an issue**](https://github.com/verifykit/verifykit-sdk-android/issues).
{% endhint %}
# Web SDK
{% hint style="danger" %}
## IMPORTANT NOTE
For the security of your application, you must make sure to send the IP address of the end user in all requests. To do this, you need to add X-Vfk-Forwarded-For header parameter in all requests.
You should send **"/access-token"** request to API domain only from your backend.
The **ServerKey** value for **"X-Vfk-Server-Key"** header is unique to your application in VerifyKit and used as both an identifier and a security measure. For this reason, you have to use your **ServerKey** token in backend integration. You can not use **ServerKey** on your client side.
{% endhint %}
## Trusted Domain
Web SDK works with an iframe structure that handles user authentication and returns session identification number on successful verification. Before using the Web-SDK, customers should whitelist their site's domain by creating a web app and registering their domain as a **"trusted domain"** on [VerifyKit Dashboard](https://dashboard.verifykit.com/).
### Token
Before each authentication, developers should get a unique and one-time authentication token in order to initialize sdk script. By sending the request in example to the "/access-token" endpoint of API domain, you can get the token value that you will use to integrate necessary iframe for Web-SDK.
#### Step 1: Fetch Token
{% tabs %}
{% tab title="cURL Request" %}
```
curl --request GET 'https://api.verifykit.com/v1.0/access-token' --header 'X-Vfk-Server-Key: YOUR-SERVER-KEY' --header 'X-Vfk-Forwarded-For: END-USER-IP-ADDRESS' --header 'Content-Type: application/json'
```
{% endtab %}
{% tab title="cURL Response" %}
```
{
"meta": {
"requestId": "172-31-36-21314",
"httpStatusCode": 200
},
"result": {
"accessToken": "1239421d9123f7794eba5f67c31231f8c52example982b8d6e6d16354a02ef",
"timeout": "2021-01-12 00:00:00"
}
}
```
{% endtab %}
{% tab title="PHP" %}
```php
$vfk = new VerifyKitVerifyKit($serverKey, $clientIp);
/** @var VerifyKitEntityAccessToken
$result */$result = $vfk->getWebAccessToken();
if ($result->isSuccess()) {
echo "Access Token : " . $result->getAccessToken() .
", Timeout : " . $result->getTimeout()->format('Y-m-d H:i:s') . PHP_EOL;
} else {
echo "Error message : " . $result->getErrorMessage() . ", error code : " . $result->getErrorCode() . PHP_EOL;
}
```
{% endtab %}
{% endtabs %}
## Iframe Integration
After successfully fetching the token string from "/access-token" response, it is needed to implement the VerifyKit iframe into your website in order to initialize Web-SDK.
There are two query parameters for the script source when requesting script.js from our widget domain.
`lang` Language of the website. Default value is 'en' (English). You can set the language of the Web-SDK screens. This parameter is not required.
`token` String that is received from "/access-token" request. This parameter is required.
#### Step 2: Iframe Integration
{% code title="HTML" %}
```html
```
{% endcode %}
## Initialize
After inserting the code block above, a callback method (cbMethod) should be created on the parent page which should use the sessionId parameter that the identification value will be assigned when the verification successfully completes. This parameter should be stored and will be used to fetch client detail from backend to backend api request.
After including the given code and creating the callback method, "initVerifyKit(cbMethod)" method can be assigned to any login mechanism website owner prefers. initVerifyKit method will initialize the iframe and set the callback method to the listener of the verification process.
When user successfully authenticates with VerifyKit, user defined cbMethod will be triggered within the sdk scripts, running the intended business flow after the successful verification.
#### Step 3: Initialize and fetch session id
{% code title="JavaScript" %}
```javascript
let cbMethod = function(){
console.log('Session id : ' + sessionId);
}
initVerifyKit(cbMethod);
```
{% endcode %}
## Backend Integration
When the verification is complete, in order to get information of the verified user, you should integrate with VerifyKit Rest API. After receiving the sessionID variable from the Web SDK, you can fetch your client's data, such as phone numbers , from VerifyKit Rest API service.
This integration requires a **ServerKey** token that is unique to your application in VerifyKit and used as both an identifier and a security measure. For this reason, you have to use your **ServerKey** token in backend integration. You can not use **ServerKey** on your client-side.
For further info on how to integrate this part please click [here.](https://docs.verifykit.com/start-to-verify/rest-api#last-step-complete-validation)
{% hint style="info" %}
**Need some help?**
We all need a little help sometimes. If you have any question or request, feel free to [**create an issue**](https://github.com/verifykit/verifykit-sdk-php/issues).
{% endhint %}
# Rest API
{% hint style="danger" %}
## IMPORTANT NOTE
For the security of your application, you must make sure to send the IP address of the end user in all requests. To do this, you need to add **X-Vfk-Forwarded-For** header parameter in all requests.
{% endhint %}
## Validation Method List
You can get verification methods and localization texts to prepare your verification screens. By sending "lang" value as a query parameter you can control the language of the localization texts in the response.
`lang`
Language of end user. Default value is 'en' (English). This parameter is not required.Response includes specific warning messages in cases of errors for developers to act upon.
#### Validation Method List
{% tabs %}
{% tab title="cURL Request" %}
```
curl --request GET 'https://web-rest.verifykit.com/v1.0/init?lang=en' --header 'X-Vfk-Server-Key: YOUR-SERVER-KEY' --header 'X-Vfk-Forwarded-For: END-USER-IP-ADDRESS' --header 'Content-Type: application/json'
```
{% endtab %}
{% tab title="cURL Response" %}
```
{
"meta": {
"requestId": "REQUEST-ID",
"httpStatusCode": 200
},
"result": {
"list": [
{
"appPackage": "whatsapp",
"name": "WhatsApp",
"app": "whatsapp",
"text": "Verify via WhatsApp",
"textColour": "ffffff",
"bgColour": "1bd741",
"icon": "https://web-rest.verifykit.com/img/web/whatsapp@3x.png"
},
{
"appPackage": "telegram",
"name": "Telegram",
"app": "telegram",
"text": "Verify via Telegram",
"textColour": "ffffff",
"bgColour": "61a8de",
"icon": "https://web-rest.verifykit.com/img/web/telegram@3x.png"
},
{
"appPackage": "otp",
"name": "Sms",
"app": "otp",
"text": "Click to verify via SMS",
"textColour": "ffffff",
"bgColour": "cbcbd0",
"icon": "https://web-rest.verifykit.com/img/web/otp@3x.png"
}
],
"description": "Please tap on your preferred messaging app and send us the code appearing on the screen.",
"localizationList": [
{
"key": "validation.description",
"value": "Please tap on your preferred messaging app and send us the code appearing on the screen."
},
{
"key": "validation.chooseAppText",
"value": "Select a messaging app to verify your phone number."
},
.
.
.
],
"messages": []
}
}
```
{% endtab %}
{% tab title="PHP" %}
```php
// composer require verifykit/verifykit-sdk-php
$vfk = new VerifyKitWeb($serverKey, $clientIp);
/** @var VerifyKitEntityValidationMethodList $validationMethodList */
$validationMethodList = $vfk->getValidationMethodList();
/** @var VerifyKitEntityValidationMethod $validationMethod */
foreach ($validationMethodList->getList() as $validationMethod) {
// $validationMethod-> getName, getApp, getText, getTextColour, getBgColour, getIcon...
}
// if you want to handle all localizations for validation steps, use this way.
/** @var VerifyKitEntityLocalization $localization */
foreach ($validationMethodList->getLocalizationList() as $localization){
// getKey, getValue of localization.
}
```
{% endtab %}
{% endtabs %}
Depending on your selection of OTP view themes on your application detail screen in VerifyKit Panel, the response structure of the init request changes.
If you choose "Recommended Theme" in VerifyKit Panel, OTP settings will be given in the list array parameter of the response. If you choose the "Basic Theme" setting in VerifyKit Panel, OTP view settings will be given in two different parameters in the root of the response as "alternativeValidationDescription" and "alternativeValidation".

#### Response Examples
{% tabs %}
{% tab title="Recommended Theme Response" %}
```
{
"meta": {
"requestId": "REQUEST-ID",
"httpStatusCode": 200
},
"result": {
"list": [],
"alternativeValidation": "otp",
"alternativeValidationDescription": "Don't use any of these apps?",
"description": "Please tap on your preferred messaging app and send us the code appearing on the screen.",
"localizationList": [
{
"key": "validation.description",
"value": "Please tap on your preferred messaging app and send us the code appearing on the screen."
},
{
"key": "validation.chooseAppText",
"value": "Select a messaging app to verify your phone number."
},
.
.
.
],
"messages": []
}
}
```
{% endtab %}
{% tab title="Basic Theme Response" %}
```
{
"meta": {
"requestId": "REQUEST-ID",
"httpStatusCode": 200
},
"result": {
"list": [
{
"appPackage": "otp",
"name": "Sms",
"app": "otp",
"text": "Click to verify via SMS",
"textColour": "ffffff",
"bgColour": "cbcbd0",
"icon": "https://web-rest.verifykit.com/img/web/otp@3x.png"
}
],
"description": "Please tap on your preferred messaging app and send us the code appearing on the screen.",
"localizationList": [
{
"key": "validation.description",
"value": "Please tap on your preferred messaging app and send us the code appearing on the screen."
},
{
"key": "validation.chooseAppText",
"value": "Select a messaging app to verify your phone number."
},
.
.
.
],
"messages": []
}
}
```
{% endtab %}
{% endtabs %}
## Start Validation (WhatsApp)
When your users choose a validation method from the screen you prepare, you can start the validation process by using the request parameters stated below.\
\
**Request Parameters**\
\
`app`This parameter represents the application you want to use in this verification instance. Could be “whatsapp”.\
\
`lang`Language of end user. Default value is 'en' (English). This parameter is not required.\
\
`deeplink`Determines if the deep link parameter will be returned in the response.If you send deeplink parameter as boolean true you will receive a deeplink parameter in the response. Useful if you integrate Rest Api for mobile applications or mobile web browsers.\
\
`qrCode`Determines if the qrCode parameter will be returned in the response. If you send qrCode parameter as boolean true, you will receive a base64 qrCode png string. By showing this qrCode to users coming from desktop browsers, you can make it easier to verify.We recommend that you do not send qrCode parameter as boolean true for requests from mobile applications or mobile browsers. You should use deeplink for these platforms."deeplink" and "qrCode" parameters cannot be boolean true at the same time. If you send both parameters as boolean true at the same time, we will only give the deeplink parameter in the response.Default value is true for deeplink, and false for qrCode. These parameters are not required.
`phoneNumber` If you add this parameter to request, WhatsApp will work as OTP. *This parameter is not required.* For example: +90\_\_\_\_\_\
\
**Response Parameters**\
\
`reference`This parameter is the code given to you in order to track the verification process on our end. You will use this string for the rest of the verification requests.\
\
`qrCode`This parameter is the base64 encoded png string which you can use as an image to help your users open WhatsApp depending on the "app" parameter you have sent.\
\
`deeplink`This parameter is used to open the application in which your users will verify on their mobile devices depending on the "app" parameter you have sent with the request.
{% tabs %}
{% tab title="cURL Request" %}
```
curl --request POST 'https://web-rest.verifykit.com/v1.0/start' \
--header 'X-Vfk-Server-Key: YOUR-SERVER-KEY' \
--header 'X-Vfk-Forwarded-For: END-USER-IP-ADDRESS' \
--header 'Content-Type: application/json' \
-d '{"app":"whatsapp", "phoneNumber:"+90...."}'
```
{% endtab %}
{% tab title="cURL Response" %}
```
{
"meta": {
"requestId": "REQUEST-ID",
"httpStatusCode": 200
},
"result": {
"deeplink": "https://wa.me/905395744034?text=.....",
"qrCode": "data:image/png;base64,iVBORw0KGgoAA......",
"reference": "111111"
}
}
```
{% endtab %}
{% tab title="PHP" %}
```php
$vfk = new VerifyKitWeb($serverKey, $clientIp);
$validationMethod = 'whatsapp';
/** @var VerifyKitEntityValidationStart $result */
$validationStart = $vfk->startValidation($validationMethod, $lang, $deeplink, $qrCode);
// if you want to redirect your user for validation, get deeplink.
echo $validationStart->getDeeplink();
// if you want to view a Qr code to your user for validation, get base64 png string and set it as an image source on web browsers.
echo $validationStart->getQrCode();
// keep this reference code for next step.
echo $validationStart->getReference();
```
{% endtab %}
{% endtabs %}
## Check Validation (WhatsApp)
With the "reference" code you received in the previous response, you can check whether the validation has been completed by the user or not.
If your user has completed the validation, you will receive a "session id" of this validation in the response.
{% tabs %}
{% tab title="cURL Request" %}
```
curl --request POST 'https://web-rest.verifykit.com/v1.0/start' --header 'X-Vfk-Server-Key: YOUR-SERVER-KEY' --header 'X-Vfk-Forwarded-For: END-USER-IP-ADDRESS' --header 'Content-Type: application/json' -d '{"app":"whatsapp"}'
```
{% endtab %}
{% tab title="cURL Response" %}
```
{
"meta": {
"requestId": "REQUEST-ID",
"httpStatusCode": 200
},
"result": {
"deeplink": "https://wa.me/905395744034?text=.....",
"qrCode": "data:image/png;base64,iVBORw0KGgoAA......",
"reference": "111111"
}
}
```
{% endtab %}
{% tab title="PHP" %}
```php
$vfk = new VerifyKitWeb($serverKey, $clientIp);
$validationMethod = 'whatsapp';
/** @var VerifyKitEntityValidationStart $result */
$validationStart = $vfk->startValidation($validationMethod, $lang, $deeplink, $qrCode);
// if you want to redirect your user for validation, get deeplink.
echo $validationStart->getDeeplink();
// if you want to view a Qr code to your user for validation, get base64 png string and set it as an image source on web browsers.
echo $validationStart->getQrCode();
// keep this reference code for next step.
echo $validationStart->getReference();
```
{% endtab %}
{% endtabs %}
## Check Validation (WhatsApp OTP)
With the "reference" code you received in the previous response, you can check whether the validation has been completed by the user or not.
In WhatsApp OTP, you must add the `code` parameter to the check request. This parameter is **required**.
If your user has completed the validation, you will receive a "session id" of this validation in the response.
{% tabs %}
{% tab title="cURL Request" %}
```
curl --request POST 'https://web-rest.verifykit.com/v1.0/check-whatsapp' \
--header 'X-Vfk-Server-Key: YOUR-SERVER-KEY' \
--header 'X-Vfk-Forwarded-For: END-USER-IP-ADDRESS' \
--header 'Content-Type: application/json' \
-d '{"reference":"REFERENCE-OF-VALIDATION", "code":"111111"}'
```
{% endtab %}
{% endtabs %}
## Start Validation (OTP)
### Country List
Firstly, prepare a screen where your user will enter their phone number and country code. While preparing this screen, you can get the list of country information such as country code and phone code by sending a request to the "/country" endpoint like the example below.
**Other parameters you can send at this request:**\
\
`countryCode`
Country code parameter for the request. We return the sent countryCode parameter at the top of the list in the response. If you want a specific country (user's country detected by ip on your side for example) to be the first response parameter, you can send countryCode with your request. Not required.
{% tabs %}
{% tab title="cURL Request" %}
```
curl --request POST 'https://web-rest.verifykit.com/v1.0/country' --header 'Content-Type: application/json' --header 'X-Vfk-Forwarded-For: END-USER-IP-ADDRESS' --header 'X-Vfk-Server-Key: YOUR-SERVER-KEY'
```
{% endtab %}
{% tab title="cURL Response" %}
```
{
"meta": {
"requestId": "REQUEST-ID",
"httpStatusCode": 200
},
"result": {
"list": [
{ "phoneCode": "string",
"countryCode": "string",
"title": "string"
},
]
}
}
```
{% endtab %}
{% tab title="PHP" %}
```php
$vfk = new VerifyKitWeb($serverKey, $clientIp);
$countryCode = "TR";
$result = $vfk->getCountryList($countryCode);
/** @var VerifyKitEntityCountry $country */
foreach ($result->getCountryList() as $country){
echo $country->getPhoneCode(); // phone code.
echo $country->getCountryCode(); // country code
echo $country->getTitle(); // country name
```
{% endtab %}
{% endtabs %}
### Send OTP Request
Then, you must post the country code and the phone number that your user entered. The response you receive includes the "reference" you will use for checking status and the validity period of this verification. During this period, a validation code will be sent to the phone number that was entered by your user. Proceed to the next step to continue verification with the user-entered code.
**Other parameters you can send at this request:**
For OTP verification to work best, you should send us the MCC and MNC code of the sim card in the user's device.
`mcc`
Mobile Country Code (MCC) of the sim card in the user's device. Default value is '999'. Not required.
`mnc`
Mobile Network Code (MNC) of the sim card in the user's device. Default value is '999'. Not required.
`lang`
Language of end user. Default value is 'en' (English). You can set the language of the sent message. This parameter is not required.
{% tabs %}
{% tab title="cURL Request" %}
```
curl --request POST 'https://web-rest.verifykit.com/v1.0/send-otp' --header 'X-Vfk-Server-Key: YOUR-SERVER-KEY' --header 'X-Vfk-Forwarded-For: END-USER-IP-ADDRESS' --header 'Content-Type: application/json' -d '{"phoneNumber":"PHONE_NUMBER","countryCode":"COUNTRY_CODE"}'
```
{% endtab %}
{% tab title="cURL Response" %}
```
{
"meta": {
"requestId": "REQUEST-ID",
"httpStatusCode": 201
},
"result": {
"reference": "123456",
"timeout": 300
}
}
```
{% endtab %}
{% tab title="PHP" %}
```php
$vfk = new VerifyKitWeb($serverKey, $clientIp);
$phoneNumber = '+90........'; // End user phone number.
$countryCode = 'TR';
$mcc = '999';
$mnc = '999';
$lang = 'en';,
/** @var VerifyKitEntityOTPSend $result */
$result = $vfk->sendOTP($phoneNumber, $countryCode, $mcc, $mnc, $lang);
$reference = $result->getReference(); // This parameter is required for a check OTP request.
```
{% endtab %}
{% endtabs %}
## Check Validation (OTP)
With the "reference" code you received in the previous response, you can check whether the validation has been completed by the user or not.
If your user has completed the validation, you will receive a "session id" of this validation in the response which means the verification process sucessfully finished.
{% tabs %}
{% tab title="cURL Request" %}
```
curl --request POST 'https://web-rest.verifykit.com/v1.0/check-otp' --header 'X-Vfk-Server-Key: YOUR-SERVER-KEY' --header 'X-Vfk-Forwarded-For: END-USER-IP-ADDRESS' --header 'Content-Type: application/json' -d '{"phoneNumber":"PHONE_NUMBER","countryCode":"COUNTRY_CODE","reference":"REFERENCE-OF-VALIDATION","code":"USER-ENTERED-CODE"}'
```
{% endtab %}
{% tab title="cURL Response" %}
```
{
"meta": {
"requestId": "REQUEST-ID",
"httpStatusCode": 200
},
"result": {
"validationStatus": true,
"sessionId": "QWERTY123456"
}
}
```
{% endtab %}
{% tab title="PHP" %}
```php
$vfk = new VerifyKitWeb($serverKey, $clientIp);
$phoneNumber = '+90........'; // End user phone number.
$countryCode = 'TR';$reference = "111111"; // reference from sendOtp step.
$code = "123456"; // The code to be entered by the user receiving the OTP.
/** @var VerifyKitEntityOtpCheck $validation */
$otpCheck = $vfk->checkOtp($phoneNumber, $countryCode, $reference, $code);
if ($otpCheck->getValidationStatus()) {
$sessionId = $otpCheck->getSessionId(); // session id for the OTP validation result
}
```
{% endtab %}
{% endtabs %}
## Last Step : Complete Validation
This is where you will get your user's credentials such as phone number et cetera. You can complete the validation by sending the "session id" parameter of the validation here. It is important to note that the domain for the post request is different from previous requests. For this last step only, you need to post the following request to **** domain in order to obtain the data of your verified user and complete validation process.
{% tabs %}
{% tab title="cURL Request" %}
```
curl --request POST 'https://api.verifykit.com/v1.0/result' --header 'X-Vfk-Server-Key: YOUR-SERVER-KEY' --header 'X-Vfk-Forwarded-For: END-USER-IP-ADDRESS' --header 'Content-Type: application/json' -d '{"sessionId":"SESSION-ID-OF-VALIDATION"}'
```
{% endtab %}
{% tab title="cURL Response" %}
```
{
"meta": {
"requestId": "REQUEST-ID",
"httpStatusCode": 200
},
"result": {
"validationType": "whatsapp",
"validationDate": "Y-m-d H:i:s",
"phoneNumber": "+9......",
"countryCode": "TR"
}
}
```
{% endtab %}
{% tab title="PHP" %}
```php
$vfk = new VerifyKitVerifyKit($serverKey, $clientIp);
/** @var VerifyKitEntityResponse
$result */$result = $vfk->getResult($sessionId);
if ($result->isSuccess()) {
echo "Phone number : " . $result->getPhoneNumber() .
", Validation Type : " . $result->getValidationType() .
", Validation Date : " . $result->getValidationDate()->format('Y-m-d H:i:s') . PHP_EOL;
} else {
echo "Error message : " . $result->getErrorMessage() . ", error code : " . $result->getErrorCode() . PHP_EOL;
}
```
{% endtab %}
{% tab title="Python" %}
```python
from VerifyKit import Verify
verify = Verify(server_key="{SERVER-KEY}")
verify.validation(session_id='{SESSION-ID}')
if verify.is_valid:
#Validation success.
print(verify.response())
elif verify.is_valid == False:
#Validation fail.
print(verify.response())
```
{% endtab %}
{% tab title="Node.js" %}
```
const VerifyKit = require('verifykit')
const verifyKit = new VerifyKit("server_key");
verifyKit.validate('session_id').then(response => {
console.log('Success');
}).catch(error => {
console.log('Verification Failed')
});
```
{% endtab %}
{% endtabs %}
{% hint style="info" %}
**Need some help?**
We all need a little help sometimes. If you have any question or request, feel free to [**create an issue**](https://github.com/verifykit/verifykit-sdk-php/issues).
{% endhint %}
## Error Codes
| HTTP Status Code | Error Code | Description |
| ---------------- | ---------- | ----------------------------------------------------------------------------------------- |
| 400 | 400007 | Invalid phone number, please check the phone number. |
| 403 | 403004 | You must send either qrCode or deeplink parameter as true in order to start verification. |
| 403 | 403011 | Validation type is not active. |
| 403 | 403012 | Phone number is banned. |
| 403 | 403013 | OTP Validation not found. |
| 403 | 403014 | OTP code is invalid. |
| 403 | 403015 | You have reached the limit of sending OTP code. |
| 403 | 403036 | Validation not found. |
| 403 | 403037 | Validation has expired. |
| 403 | 403038 | Undefined application. Please check your credential parameters. |
| 403 | 403041 | You have reached the limit of package validation count. |
| 403 | 403042 | Please check your account balance on VerifyKit Dashboard. |
| 403 | 403043 | Please check your account balance on VerifyKit Dashboard. |
| 403 | 403048 | Email is invalid. |
| 403 | 403047 | OTP setting is not active. |
| 403 | 403049 | OTP can only be used with test numbers. |
| 429 | 429001 | Too many requests. please try again later. |
| 500 | 500008 | Internal server error. |
#### Error Response
{% code title="Response" %}
```
{
"meta": {
"requestId": "REQUEST-ID",
"httpStatusCode": "HTTP_STATUS_CODE",
"errorMessage": "ERROR_MESSAGE",
"errorCode": "ERROR_CODE"
}
}
```
{% endcode %}